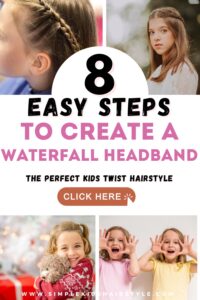
Creating a cute, simple, and protective hairstyle for kids doesn’t have to be complicated or time-consuming. One of the best options for busy moms is the faux waterfall headband kids twist hairstyle. This fun, chic, and easy-to-do hairstyle works well for all hair types, whether your child has straight, curly, or wavy hair. Not only is it a great hairstyle for school, birthday parties, or casual days at home, but it also protects your child’s hair from damage while still looking fabulous. Let’s dive into how you can create this stylish look in 8 simple steps!
This post includes affiliate links, which means if you make a purchase through one of these links, I earn a small commission at no extra cost to you. This helps me keep providing high-quality content on this site for free. Rest assured, I only recommend products that I personally use and believe will be helpful for my readers.
8 Easy Steps to Create a Faux Waterfall Headband: Perfect Kids Twist Hairstyle
Why Choose a Faux Waterfall Headband for Kids?
Before we get into the steps, let’s talk about why the faux waterfall headband is a great choice for your little one. This hairstyle is a perfect blend of beauty and convenience.
- Easy and Quick: One of the best things about the faux waterfall headband is how quickly you can create it. It takes less than 10 minutes to do, making it ideal for busy mornings.
- Protective Style: Twist hairstyles, including two-strand twists, are known for being low-maintenance and protective. They help to reduce breakage and promote hair health while still being fun and stylish.
- Versatility: Whether your child has long or short hair, this hairstyle can be adjusted to fit any hair length or texture. It’s especially great for curly hair, as it highlights natural curl patterns and adds volume.
- Perfect for Various Occasions: The faux waterfall headband can be worn to school, parties, or any event where your child needs a polished yet playful look. Add gold hair accessories or a high ponytail for extra flair!
The 8 Easy Steps to Creating a Faux Waterfall Headband
Let’s break down how to achieve the perfect faux waterfall headband look in just 8 simple steps. Grab your hair accessories and let’s get started!
1. Start with Curled Hair
Begin by curling your child’s hair. Whether your child’s hair is naturally straight, wavy, or curly, starting with defined curls will give the waterfall effect a more voluminous, flowing look. Use a flat iron or curling wand to add loose curls to the hair. Keep the curls relaxed – tight curls can make the waterfall effect too rigid.
- Tip: If your child has naturally curly hair, you can skip this step. Instead, use a curl cream or gel to enhance their natural texture.
- Tools Needed: Flat iron or curling wand, heat protectant spray, hair clips.
2. Create a Deep Side Part
A deep side part is essential for the faux waterfall effect. It creates a dramatic separation in the hair that will frame the face and give the look an elegant touch. To do this, use a rat-tail comb to part the hair deeply to one side. Depending on your child’s face shape, you can adjust the part to one side or the other. For a more symmetrical look, you may want to try a center part.
- Tip: If you’re unsure which part looks best, experiment with a few options to see which works with your child’s hair texture and face shape.
- Tools Needed: long-tail comb.
3. Create the 3-Strand Braid
Take a small section of hair from the parted side and begin braiding a three-strand braid close to the part. This braid will act as the foundation for the waterfall effect. Make sure to start the braid high near the root, as this will help keep the hairstyle tight and secure.
- Tip: If your child has shorter hair, a single-strand twist can work as well. For longer hair, you can make the braid as long as you need it to be.
- Tools Needed: Small elastic bands to secure the braid.
4. Pull the Elbows of the Braid
Now, the fun begins! Once the braid is secure, gently pull on the outer edges of the braid. This process is known as “pancaking” the braid. Gently loosen the edges of the braid to create a wider, softer look. This will create the illusion of a waterfall cascading down the side of your child’s head.
- Tip: Be careful not to pull too hard – you want the braid to remain intact while loosening the strands.
- Tools Needed: Hair clips to hold the braid in place while you work.
5. Pull Sections Through the Loops
Take small sections of hair from the front of the head and loop them through the braid’s “elbows” (the pulled-out sections of the braid). This creates the signature waterfall effect. Pull one section through at a time, and secure each with a bobby pin if necessary.
- Tip: If your child’s hair is thicker, you can add more sections to create a fuller waterfall. For finer hair, you can use fewer sections for a more delicate look.
- Tools Needed: Bobby pins to secure sections.
6. Tuck and Secure the Braid
Once all sections have been pulled through the braid, tuck the remaining braid under itself. This step keeps the look seamless and tidy. Use a bobby pin to secure any loose ends.
- Tip: Make sure the tucked braid doesn’t stick out by checking from different angles.
- Tools Needed: Bobby pins, hair ties.
7. Tease for Volume
To achieve extra volume, gently tease the front sections of the hair. Use a rat-tail comb to lift the hair at the roots, creating more fullness and a more dramatic waterfall effect. This step adds a fun, textured look to the style.
- Tip: For a sleeker finish, skip this step. Teasing works best for achieving a more voluminous, carefree style.
- Tools Needed: Rat-tail comb, hairspray.
8. Finishing Touches
Now that the main structure of the faux waterfall headband is complete, add any finishing touches to make the hairstyle pop. You can add fun accessories like gold hair clips or a cute bow. If desired, secure the style with a light mist of hairspray to keep it in place all day.
- Tip: If your child prefers a more casual look, you can add a high ponytail or puff balls to complete the style.
- Tools Needed: Hairspray, hair accessories (optional).
Tips for Styling Kids’ Hair with Waterfall Braid Techniques
Here are a few extra styling tips to make the faux waterfall headband work for your child’s hair:
- Combine with Other Styles: You can combine the faux waterfall headband with other styles like a braided ponytail or double buns for a unique look.
- Use Fun Hair Accessories: Gold hair accessories, such as clips or beads, can add a chic touch to the style.
- Adjust for Different Hair Types: Curly hair may need more product to define curls, while straight hair may require extra teasing for volume.
How to Adapt the Faux Waterfall Headband for Different Hair Types
Not all kids’ hair is the same, and that’s okay! Here’s how to make the faux waterfall headband work for different hair types:
- Straight Hair: If your child has straight hair, the faux waterfall braid will naturally look sleek and neat. Just make sure to add volume at the roots by teasing the hair.
- Curly Hair: For curly hair, this hairstyle works beautifully! Embrace the natural texture by adding a curl cream or gel to enhance the curls and prevent frizz.
- Wavy Hair: Wavy hair can be styled effortlessly into this look. A little mousse or sea salt spray will help add texture and volume to the waterfall effect.
Add Simple Hairstyle Ideas to Enhance the Faux Waterfall Headband
One of the best parts about the faux waterfall headband kids twist hairstyle is how versatile it is. You can easily enhance the look by incorporating a few simple hairstyle ideas that will elevate the style without complicating the process. Whether you’re using rubber bands to secure twists or adding gold accessories for a pop of sparkle, this look can be adapted to suit any occasion.
Here’s how you can incorporate these elements into your faux waterfall headband hairstyle for a more personalized touch.
1. Use Rubber Bands for Added Control
For a sleek and controlled style, incorporate rubber bands into your twists. After completing the waterfall braid and pulling sections through the loops, secure each section with a rubber band at the base to keep the style intact. This technique is especially useful for those with thicker hair that needs extra hold. You can even use rubber bands as accents throughout the hairstyle for a cute, detailed touch.
- Tip: Use clear or colorful rubber bands that match your child’s hair color or outfit for a more cohesive look.
2. Add Gold Accessories for Extra Shine
Adding gold accessories can give the faux waterfall headband an elegant touch, turning a simple hairstyle into a sophisticated, fun style. Gold clips, beads, or even gold-rimmed hair ties can be woven into the twists or placed at the base of the waterfall braid. The best part of this addition is that it instantly adds a touch of glamour without taking away from the simplicity of the style.
- Tip: Be sure to use lightweight gold accessories that won’t weigh down the hair. A few strategically placed clips or beads will add just the right amount of sparkle.
3. Keep the Hairstyle Simple and Stylish
When you’re short on time but still want a chic look, a simple hairstyle like the faux waterfall headband is the perfect solution. This easy style can be dressed up or down depending on the occasion. Whether you’re prepping your little one for a birthday party, a school day, or a casual outing, this style requires minimal effort but still delivers maximum impact. Pair it with minimal accessories for a more laid-back look or go for more glamour with gold accessories.
- Tip: For an even simpler version, just leave the hair down and create loose twists or a braided ponytail for an easy way to add texture and style without over-complicating things.
4. Get Creative with Hairstyle Ideas
The beauty of the faux waterfall headband is that you can mix and match it with other fun hairstyle ideas to create the perfect look. You could combine the waterfall effect with two-strand twists, flat twists, or even puff balls. This gives you endless possibilities, ensuring that your child’s hair will always look fresh and different. Whether you’re preparing for a special occasion or simply getting them ready for school, there are so many ways to experiment with this classic look.
- Tip: Try adding a braided ponytail at the end of the waterfall braid for a fun variation that keeps the style neat and manageable.
By integrating these hairstyle ideas, you can easily customize the faux waterfall headband to fit your child’s unique personality and style. Whether you’re opting for a more elaborate look with gold accents or keeping things simple with rubber bands, this hairstyle is adaptable to any occasion while keeping hair protected and stylish.
The faux waterfall headband kids twist hairstyle is a perfect choice for parents looking for a cute, stylish, and easy-to-do hairstyle for their little ones. Whether it’s for the first day of school, a birthday party, or just an everyday look, this hairstyle is both practical and beautiful. By following these 8 simple steps, you can create a fun, elegant, and protective style that will keep your child’s hair looking great all day long.
Give this hairstyle a try today – it’s the perfect combination of fun, style, and simplicity!
FAQ Section
1. What is a faux waterfall headband hairstyle?
A faux waterfall headband hairstyle is a twist on the classic waterfall braid, where small sections of hair are pulled through the loops of a braid to create a cascading effect along the side of the head.
2. How long does it take to create the faux waterfall headband?
It typically takes just 5-10 minutes, making it ideal for busy mornings when you need a quick and stylish look.
3. Can I do the faux waterfall headband on my child’s curly hair?
Yes! Curly hair works wonderfully for this style. Simply enhance the curls with a curl cream or gel for extra definition.
4. What tools do I need to create a faux waterfall braid?
You’ll need a flat iron or curling wand (if you’re curling hair), a rat-tail comb, bobby pins, hair ties, and some hairspray to finish off the look.
5. Can I combine the faux waterfall headband with other hairstyles?
Absolutely! You can combine it with a braided ponytail, puff balls, or even double buns for a fun twist on the look.
So, if you’re looking for kids twist hairstyle for toddlers give these cute kids twist hairstyle a try. It’s a win-win for moms and kids on holiday! Don’t forget to share your own tips and favorite hairstyles on Tiktok, Instagram or Pinterest.